Image masking allows you to create unusual and unique edge effects for your photographs and other graphics. You can also use these images in Camtasia Studio to add masking effects to your videos (see a sample video here.)
For this tutorial you will use a black and white geometric pattern image. You can download some here. Or, do a Google image search for “black and white geometric pattern” and use one you like. It should have plenty of white space which becomes transparent allowing your photo or video to show through.
This is the image mask created in this tutorial.
Image may be NSFW.
Clik here to view.
Change the Geometric Image to Two-Colors
Some images may look like two-color black and white but might also include other colors you cannot see. In this process, the image will be changed to just two colors.
This is the image used in this tutorial.
Image may be NSFW.
Clik here to view.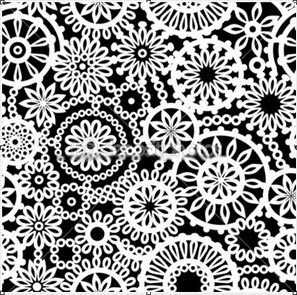
1. With the black and white image open in Snagit Editor, select File > Save As.
2. Give the file a name.
3. Set the File type for GIF.
4. Click Options button > Colors > 2 color > OK.
5. Close the image in Snagit Editor.
Change the Geometric Image to Black and White With Color Substitution
Reopen the same image you just saved. You will see a diffImage may be NSFW.
Clik here to view. erence in the image. This is okay. Also, the image might not be exactly black and white. So, in the this process, the image will be changed to exact black and white.
Choose Image tab > Modify group > Color Effects button > Color Substitution.
- Choose Add.
- Click the Old color eye dropper. Click the dropper on the color in the image that is mostly gray or black.
- Click the New color swatch. From the palette, choose black.
- Repeat steps 1-3 turning the color that is most like white into pure white.
- Click OK to exit and return to the Editor.
Image may be NSFW.
Clik here to view.
Make the White TransparentImage may be NSFW.
Clik here to view.
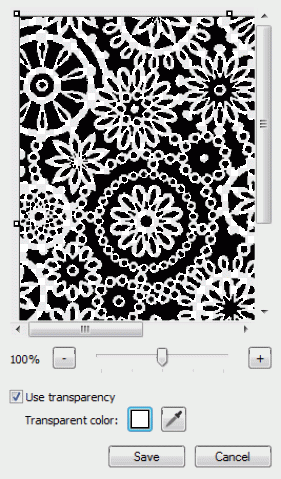
- Choose File > Save As. The file format should already be set to GIF.
- Check the Use transparency option.
- Use the color dropper to click on white in the image. You should now see gray/white checkerboard where the white used to be.
- Click Save.
- Close the image in Snagit Editor then reopen it. The white background should now be transparent as noted by the gray and white checkerboard.
Create a New Canvas
- Press <CTRL+N>. In the New Canvas dialog box, enter Width and Height: 800 x 600 for a standard size or 1080 x 720 for HD size.
- Make sure transparency is set for the Canvas color. Image tab > Canvas group > Canvas color > Transparent.
Create The Image for the Mask
In this process, add multiple copies of the black and white image to the new canvas. The way the image is positioned around the edges of the new canvas dictates how your final mask will look.
Tip: You can resize, overlap, or rotate, each image to get the look you desire around the edges of the canvas.
- Drag the black and white image to the new canvas and drop it by an edge.
- With the image still selected, press Ctrl on the keyboard then click and drag another image from the selected
image. (Or, copy and paste.) - Repeat until the entire image is covered with random instances of the black and white
- When all the images are placed, right-click the canvas and choose Flatten All.
This is how our mask image turned out:
Image may be NSFW.
Clik here to view.
Create the Mask
In this process, use various tools and shapes to cutout the middle of the canvas and create the space where the image will show.
You can use a variety of drawing tools to create the space. Tools might include the freehand pen, lines, arrows, and shapes.
Tip: Any tools you use should have the Shadow turned off.
Begin drawing and removing pieces around the edges about ½ – 1 inch inside the border. Repeat to get the look you desire.
For this example, I used the Freehand Selection tool to draw one random line around the edge of the patten image. Then, deleted the cutout. Your image will look similar to the following.
Image may be NSFW.
Clik here to view.
Finishing Up
Here are several more things you can do with your image mask:
- Save the image as a PNG file when you have the look you desire.
- To get a white version of the mask, choose Image tab > Modify group > Color Effects button > Invert Colors. Choose File > Save As and rename this version of your mask image.
- To adjust the opacity of the mask, select the stamp on the canvas. Then, choose Tools tab > Styles group > Effects > Opacity.
- To use as a video mask in Camtasia Studio, with the image open in Editor, choose Share tab > Camtasia Studio.
- To use the image mask as a stamp so you can add shadow effects, follow this process:
- In the Styles Stamp gallery, click the down arrow.
- Click the Create Folder button and name it.
- Click the Add Stamps button. Browse to find the images to be made into stamps.
- Select the mask image(s).
- Click Close.
Image may be NSFW.
Clik here to view.
The post Create an Image or Video Mask Using Snagit 12 appeared first on TechSmith Blogs.